arivis Scientific Image Analysis

Identify Objects in Electron Microscopy Images

Contact us
USE CASE

The Challenge

Identifying objects in images acquired by electron microscopy (EM) can be challenging. Since contrast and intensity distributuion in EM images is generally low, simple segmentation algorithms which are based on intensity thresholds or contrast detection often fail with such datasets. This issue is especially pronounced in tissue samples where cells or organelles with comparable density boarders lie close together. This makes the discrimination of neighboring objects difficult because intensity differences and contrast are low. There are, however ways to cope with these images. One is to manually segment the objects of interest by encircling them by hand, plane by plane, and by fusing these segments at the end. While this method bring success, it is very tedious and time consuming.
Automatic algorithms and machine learning (trainable segmenters) can speed up the process of segmenting EM images enormously. To make these approaches successful, it is necessary to crudely isolate the objects of interest first in a manual step.

Solution Provided in VR Environment

Here, we want to demonstrate an approach to segment mitochondria in a 3D transmission EM image by manually pre-segmenting the image using Virtual Reality and subsequently identifying mitochondria in the pre-segmented image. This method brings considerably faster results than manual segmentation procedures and can achieve high accuracy.

The workflow was created using ZEISS arivis Pro (formerly Vision4D) and the arivis Pro VR toolkit (formerly VisionVR).

STEP 1

Place Seed Objects in Mitochondria

1-min

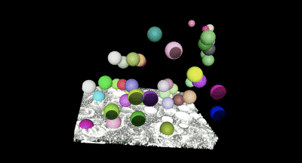
Figure 1: Seed objects marking individual mitochondira. By marking the mitochondria with seeding objects, the basis for subsequent manual presegmentation is laid out.

1 (1)-min

Figure 2: Adjust the Color Transfer Function (CTF) to display structures in a semitransparent way. Doing so, it is easier to have an overview over the sample.


In order to segment objects, a seeding object is placed quickly and accurately in Virtual Reality. This is done using the the “Create Segments” tool to place spheres in all mitochondria. To get a better overview, one can adjust the Color Transfer Function in a way to show the image in a semi-transparent way. Also, activate left hand clipping in the Tool menu of the Clipping tool to dynamically clip through the image and keep a good overview of the image.
STEP 2

Sculpt Seed Objects to Crudely Cover the Objects

Using the sculpting tool, you select all individual seeding objects and expand them to encompass the entire mitochondria in 3D. It is not important to draw precisely along the border of the organelle but it is essential to cover the whole structure with the manually drawn segment. Again, use the left hand clipping tool to check the result.

3-min

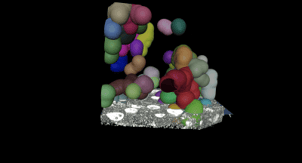
Figure 3: Scultpted mitochondria. Sculpting describes the process of manual presegmentation. Starting from the seeding objects, you expand those objects with a brush tool to fully encompass the mitochondria.

STEP 3

Switch to ZEISS arivis Pro

4-min

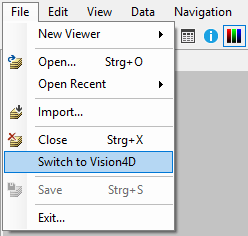
Figure 4: Switch to ZEISS arivis Pro (formerly Vision4D).
The arivis file format enables switching between VR and our powerful desktop image analysis program with the click of a button. All image data and metadata are transferred during this step.

Use the “Switch to Vision4D” functionality to open the dataset in ZEISS arivis Pro (formerly Vision4D) on your desktop. It will display the segments created in the VR environment.
STEP 4

Start Automatic Analysis Pipeline

Open a new Analysis Pipeline and use the Segments you created in VR as a mask to run a subsequent analysis operator.

5_0-min

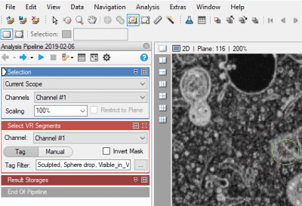
Figure 5: Select Objects created in VR a mask fort he original image. The “Annotation Mask” Operator enables you to select the objects you created on VR as mask for subsequent analysis steps. Simply drag &drop the Operator into the Analysis Pipeline and select the Tags “Sculpted, Sphere drop, Edited in VR”.

STEP 5

Create Foreground and Background Features

9-min

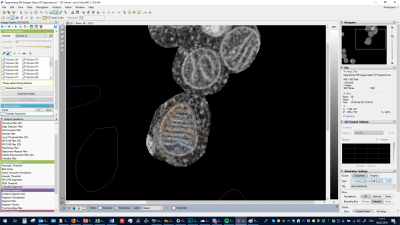
Figure 6: Define Foreground and Background features. In order to train the Trainable Segmenter, you need to define foreground and background objects as a decision basis for the machine learning algorithm. To do so, select the Create Manual Annotation Tool-> Create Freehand Annotation Tool and draw foreground and background feature objects. Add them to the respective list in the Trainable Segmenter Operator by selecting the respective list as well as the objects in your Annotation window and click on “+”.

In this case, we use a machine learning approach to segment the mitochondria. For this, foreground and background features have to be determined by manually drawing them on a 2D plane and adding them to the list.

STEP 6

Select Classifier Features

In order to train the machine learning algorithm, it needs a set of classifier features to work with. Click on the button and choose a set of classifiers Classifiers are pixel features that will be used afterwards to discriminate between a pixel being part of an object of interest or not. You can choose between Color, Edge (Contrast), Texture and Orientation as such features. The different size values indicate the size of the Gaussian blur that is added before the filter is applied. By doing so, it is possible to identify pixel classes on a larger scale. If you are uncertain what classifier to use, you can always select all. This however will slow down the process and result in an increased processing time.

10_0-min

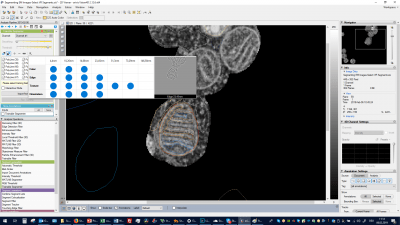
Figure 7: Select Classifier Features. Classifier Features determine, which features are considered being important for the machine learning algorithm when it decides for a voxel being foreground or background. Usually, edge and structure are very effective classifiers

STEP 7

Run Training

11_0-min

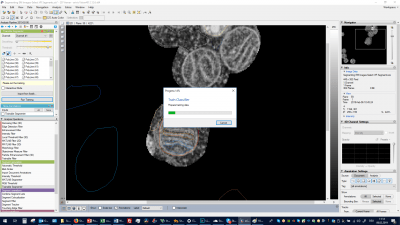
Figure 8: Before running an analysis, the Operator needs to be trained. After this is done, you are able to have a preview on the segmentation result by clicking on the eye button. You can adjust the result by changing the values for Threshold and Smoothing. It is also possible to add more foreground and background features afterwards, however, the algorithm needs to be trained afterwards again to add this new information.

Train the Operator based on the information it has. To see a preview, click on the eye button within the operator. You can adapt the result by adjusting the threshold and smoothing sliders on the left. If the result is unsatisfying, try to add more foreground and background features as well as an extended set of classifiers.
STEP 8

Run The Analysis

Run the analysis to see the overall result.
A filtering step can also be added to clean up the result.

last-2-min

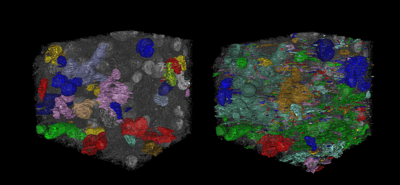
Figure 9: Comparison of the same trainable segmenter segmentation result with and without presegmentation in VR. The result on the left represents the workflow as described here with presegmentation using ZEISS arivis Pro VR (formaerly VisionVR) . Mitochondria are nicely separated and highlighted by random color segments. The right hand image shows the result of the same machine learning algorithm without using the presegmented image mask. Here, mitochondria are visibly oversegmented. Also major parts of the cytosol and other organelles are segmented.